MKL’s 2004 BMW R1150RT
Dual Stebel Compact Nautilus Air Horn Test
Replacing the pair of stock Bosch horns with Stebel Compact Nautilus Air Horns (1/07)
Background: While a horn in and of itself is not something a rider should rely on to avoid trouble, it can serve a useful purpose in certain situations, especially during rush hour commutes. Moto-commuters know that a wimpy horn barely registers on car drivers’ radar screens, as they sit in their well insulated interiors listening to radios, yammering on cell phones, arguing with their toddlers, or otherwise just plain distracted. Indeed, when your fellow drivers need to be jogged into the moment, a loud horn is just the ticket. The idea here was to create an affordable, reliable horn setup that would install easily in accessible locations, and of course outperform the stock horn. All of these factors are often at odds with each other, but in this case, the idea translated quite well into reality.
Test Baseline: My 2004 RT arrived stock with a pair of fairly powerful Bosch horns, with one horn located right behind each side of the oil cooler, beneath the plastic side panels. An online search for a truly compact, inexpensive, and dependable air horn yielded a fair number of results, but none as promising as Stebel’s Nautilus Compact Dual Tone Air Horn, at about $37 per copy. This Italian-made 139 dB blaster, totally self contained and barely larger than the RT’s conventional stock Bosch unit, seemed to be the unit of choice on various internet forums. I ordered 2 of them, in the hopes of a clean swap from stock.
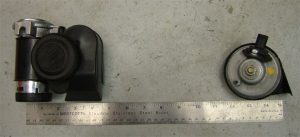
The Stebel Compact Nautilus Air Horn (left) is about an inch wider than the stock Bosch unit on the right (1/07)
The Stebel Horns and Relays: Each Stebel air horn arrived in a neatly packaged box containing the horn, mounting hardware, mounting block, adapter for routing the air intake away from dirty or wet areas (not really applicable on the RT) and one 12 VDC, 30A Bosch-style relay. Relays are used to isolate one electrical circuit from another, allowing a low current control circuit to make or break an electrically isolated high current circuit path. Since the initial starting current to power up an air horn’s compressor is quite a bit higher than a stock conventional horn’s starting current, isolating the bike’s switchgear and wiring harness via relay ensures that nothing gets fried. So when in doubt, add the relay! Astute RT owners will point out here that this model already includes a relay on the horn circuit as standard equipment. As such, the RT’s horn switch is already safe, only switching the low current for the relay coil as opposed to the high current of horns directly. Yet, there are still important benefits to employing the relays included with the Stebel horns, as follows:
A) First, the RT’s stock relay is not adequate to handle the current of the two Stebel air horns as planned on this experiment. It is easier to add the new relays than to dig out and replace the stock one with a larger model.
B) Second, the RT’s factory harness has meager 18 gauge wires to feed the stock horns. By utilizing the included relays and running some 12 gauge wire directly from the battery + to them, the higher voltage the horns receive translates into more real-world decibel output.
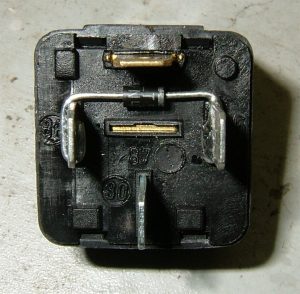
First Things First – Relay & Diode Modification: A diode is the electrical equivalent of a valve that permits current flow in only one direction. The relay included with each air horn did not have a diode across its coil, but ideally it should. In this particular case, when the voltage source is removed from the relay coil as the horn switch is released, an enormous voltage spike as high as 1000V can occur. This spike can cause insulation breakdowns elsewhere on the circuit’s wiring harness, or damage the horn switch itself. By connecting a ten cent 1A 100V diode across the relay’s coil, a “roadblock” is created which totally eliminates the destructive potential of such a dangerous spike, so it is obviously worthwhile to do so. For this application, I used a commonly available 1N4003 diode, and carefully soldered it across the relay’s coil terminals. Note that the stripe marked on one side of the diode indicates its polarity, and this striped side (right side below) is where the wire bringing the 12 VDC from the horn switch to the relay is connected. {Note: FYI the RT’s single stock relay does have a diode installed].
The 1N4003 Diode soldered across the coil terminals of the Stebel’s 12V 30A Relay (1/07)
Basic Setup – Mechanical: The dense packaging of some motorcycles is no less than a marvel of engineering. Under their swooping, aerodynamic bodywork lies a network of hardware and wiring which can make finding a few unpopulated square inches a definite challenge. Luckily, this was not the case on the RT, since the Stebel horns are not much larger than the stock Bosch units. The Stebels simply mounted up in exactly the same location as the stock units, bolted directly to the frame as before. Some minor wire jiggling was required to eliminate any interferences, but overall, the mock installation was a cakewalk. Once it was determined that the Stebels could mount with adequate clearance to allow the surrounding wiring some room, a small area near each horn was designated to mount the relays. The relays were simply zip-tied securely to the frame near the horns, taking care to maintain clearance between any electrical connections and the frame.
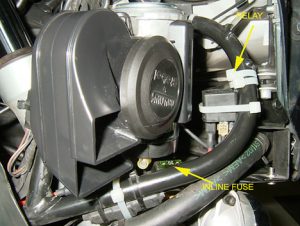
The left and right side Stebels mounted in the stock Bosch horn locations, directly behind the oil cooler. (1/07)
Basic Setup – Electrical: The basic setup is extremely easy to wire up, and there are straightforward schematics to follow in the printed Stebel horn instructions if reference is required. For the dual horn solution proposed herein, a simple wiring harness needs to be constructed using commonly available 12 gauge wire, spade lugs, and eye connectors to facilitate connection between the relays, ground, battery, and horns. A wire stripper and wire crimper are required tools for the job. It’s wise to use heat shrink tubing where the lugs and wires meet, as well as some dielectric grease on any terminals, to prevent corrosion from forming on contact surfaces. Here are the connection essentials:
1) The stock 18 gauge horn switch wires are used to trigger the two relay coils rather than to power the horns directly, as they were not ideal to supply the total amperage required for the two Stebels – remember to connect the positive horn switch wire to the striped diode side of the relay coil.
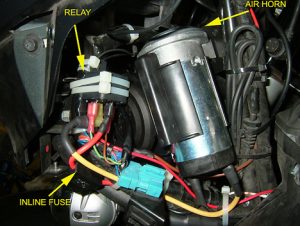
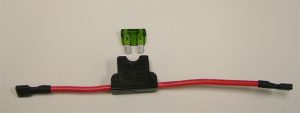
2) Power for each horn was run directly from the battery + via 12 gauge wire, and into one of the two remaining terminals on each respective horn’s relay. This is the thick red wire shown above, plugged into the relay. For safety purposes, it’s a good idea to install 30A blade-type in-line fuses on these power wires. See below:
A 30A inline fuse should be installed on the power lines from the battery + to the relay (1/07)
3) Run power from the last remaining terminal of each relay into the + terminal of its respective horn with some more 12 gauge wire. This is the thick yellow wire shown above, plugged into the relay and the horn.
4) Run a ground wire from the – terminal of the air horn compressor to the – side of the battery or other appropriate ground. This is the thick black wire shown above, plugged into the air horn’s – terminal.
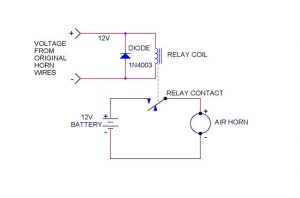
When all is said and done, the circuit for each of the two horns is as shown in the schematic below.
A Basic schematic showing each separate horn’s connection as proposed herein (1/07)
It should be noted that in place of the two 12 VDC 30A relays included with the Stebel horns, one 60+A relay can be cheaply procured and used instead. While this would reduce the complexity of the wiring involved, it would do away with the dual relay setup’s redundancy. With two relays utilized as shown herein, should one relay fail, the other will still allow one of the horns to operate. Also, it might be harder to find room for one large relay as opposed to two smaller ones.
Test Blast: With connections now made, it’s a good idea to test the system before going through the trouble of reinstalling the Tupperware. Make sure the horns and relays are secure, turn on the ignition, cover your ears, and blast away! Check for any clearance issues and make sure no sharp edges are anywhere near the wires. Zip-tie any loose wires to secure them, and tighten down any hardware utilized in the installation. Reassemble any bodywork or related components, and bask in the glory of a job well done.
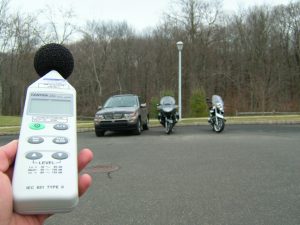
Testing the setup in a three-way comparison with a CTC 320 Sound Level Meter (1/07)
So How Loud Is It?: You will jump out of your skin at the shear volume of two air horns screaming in parallel, which sounds very much like a semi-truck’s horn on steroids! On paper, stock horns are usually in the 85-90 dB range, so just one Stebel Compact Nautilus Air Horn (rated at 139 dB) is over four times as loud as stock (the decibel scale is not linear). Two in parallel is bordering on deafening. Of course, just how deafening is the question at hand.
To find out, I arranged a comparison test between the newly improved RT and some other vehicles in the household, namely my girlfriend Terri’s 2004 BMW R1150R and my 2005 BMW X5, both with stock horns. While hardly a proper scientific test, it does give us some idea of what this upgrade is worth. Using a calibrated Center Technology Corporation Model 320 Sound Level Meter, standing 50 feet back from the pre-op RT, and with ambient noise hovering at 35 dB, the stock horn registered 81 dB. So this was the figure to beat. The results post-installation, taken again at 50 feet distance with ambient noise still hovering at 35 dB, were as follows:
| MODEL YEAR | MAKE / MODEL | DISTANCE | AMBIENT NOISE | MEASURED dB W/ HORN |
| 2004 | BMW 1150RT W/ DUAL STEBELS | 50 FEET | 35 dB | 109 dB |
| 2004 | BMW 1150R WITH 1 STOCK BOSCH | 50 FEET | 35 dB | 89 dB |
| 2005 | BMW X5 4.4i (STOCK) | 50 FEET | 35 dB | 82 dB |
–CLICK HERE FOR A VIDEO CLIP OF THE 3-WAY HORN COMPARISON–
Conclusion: At 50 feet, the RT’s horn performance went from roughly the volume of a canister vacuum cleaner (~80 dB) in stock form to roughly the volume of front row at a rock concert (~110 dB) in air horn configuration – a clearly discernable difference! The total cost for the project was relatively low (under $100.00,) with the horns purchased online and everything else (all the electrical wiring, connectors, fuses, dielectric grease, tools, etc.) purchased at Radio Shack. Most importantly, given the universality of installation described, the setup described above can serve any motorcyclist who would like to add some precious decibels to his / her survival toolkit.
After using this horn setup for a few weeks, I can say without question that having a louder horn is especially useful for commuter / heavy traffic applications, given the dismal rate of awareness of surrounding drivers. A false sense of security should not apply, and while no substitute for awareness and skill, the new horn setup succeeds in garnering attention where the stock setup failed miserably.
