MKL’s ’98 1200C – Nallin Racing Stage II Heads and Mikuni HSR42 Carburator 4/7/01
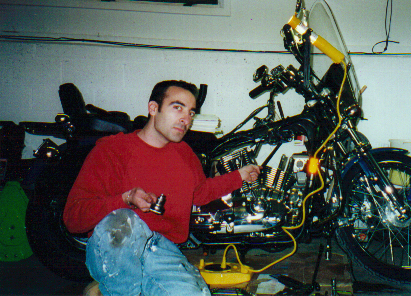
Tearin’ Down the Motor 1/01
This project was designed to bring the engine squarely into the high-performance street category, which I define as an 80+HP machine that is reliable enough to still be used as a daily driver. First, some background-
Why Nallin Racing?– The story of this engine upgrade is long, and filled with irony. Initially, I had bought a stock set of Buell Thunderstorm heads and pistons, and had sent them out for some mild porting and polishing. To save a few bucks, I sent them to someone on the XL List who had promised great results, and had pictures of his past work to back up his claims. I trusted him, and what I got in return was a totally mangled set of heads and pistons, which were beyond any hope of repair. Naturally, the guy then refused to take any responsibility for the mess he had caused. Lesson: LET A REPUTABLE PRO DO THE JOB!
Disgusted, and not wanting to pass these warped items on to someone unsuspecting, I was ready to throw everything in the garbage when another lister told me about Brian Nallin’s Racing Head Service. After some research, I found that Nallin’s shop is well respected in the Buell community for top quality headwork, and better yet, they took stock used Thunderstorm heads as “core” trade-ins for new worked heads. So, I threw the old pistons out, packed up the heads, and sent them in as trades towards Nallin’s “Stage II” heads. Nallin himself was out of stock, so I got some leftover Nallin heads from Sporttwin.com – I was treated very well by the staff there, and I had heads the next day to boot.
The Nallin Racing Stage II Head: Nallin’s website’s description of his Stage II Cylinder Heads is that they are ” subjected to much of the same treatment as Stage 1 heads, except that these get the big valve treatment. Stage 2 heads are machined for larger valve diameters, such as 1.810 in. intake and 1.580 in. exhaust valves for Lightning heads and 1.840 in. intake and 1.615 in. exhaust valves for Thunderstorms. These valve diameters have shown to be a great balance between maximum flow and maximum street/strip durability. All of the Stage 2 heads receive NRHS “Black Magic” valves and high quality springs with titanium retainers and 10-degree locks and will accept cam lifts up to .575 in. lift (larger lift capacity springs available upon request). The porting procedures differ somewhat from the Stage 1 in that all the stops are pulled out and airspeed and airflow are absolutely maximized through a process that is unique to Nallin Racing & Head Service, Inc., and is proven both on the track and on the dyno. These heads are by far the most popular choice because of their versatility to be utilized in both mild and wild combinations. This feature allows the customer to install the heads, observe gains, and then build upon them without having to re-port the heads, which equates to more cost. All of the careful documentation that goes into a Stage 1 head in regards to assembly, and overall airflow balance also pertains to a Stage 2 head.”
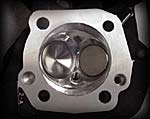
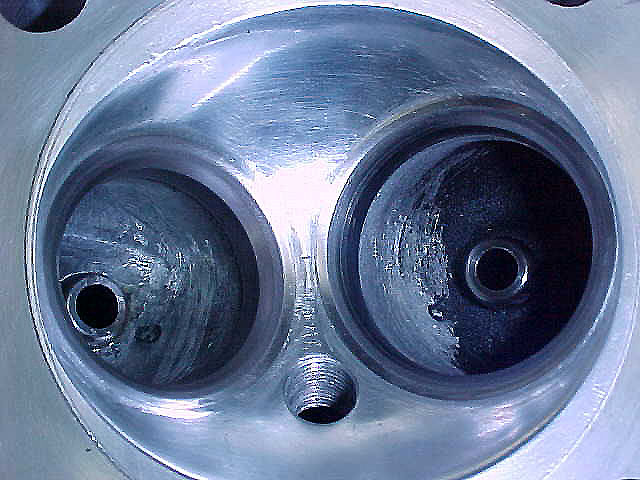
Nallin Racing Stage II Thunderstorm Head
Unfortunately, all of the detailed close-up photos I took for this page prior to assembly got lost in a hard drive crash – but suffice to it say that the Nallin’s work was absolutely top notch. Everything was very neat and clean – and the difference in the ports between stock Thunderstorm and Nallin Stage II was quite substantial! I wish I had those pictures – they’re worth a thousand words. Nallin himself was extremely helpful and courteous on the phone, answering all of my concerns patiently. He is definitely a class act and one of the friendliest vendors I’ve ever dealt with.
What About the Cores? At the end, the cores were so badly warped that Nallin could not make use of them, so they were returned to me, and I received no trade-in value for them. However, unless your heads are butchered like mine were or your fins are cracked, you will likely get credit, making these heads unusually cheap for the amount of work done.
Other Components Used in the Build: To supplement the heads, I kept the N4 cams and used the following components in the build:
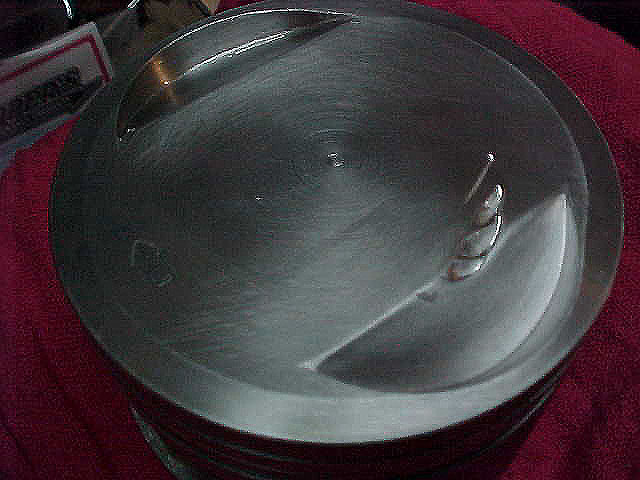
1) Buell Thunderstorm Pistons (0.005″ Oversize) – I should have gone with a larger size, as the bottom of my jugs had warped slightly over their 20,000 miles of use, and the 0.005″ bore didn’t round out the jug bottoms. Standard Buell TS rings were used.
2) S/E 1998 Dual Fire 6,800 rpm “Street” Ignition Module – Technically, this is a step down from my former Dyna 2000i selectable curve, single-fire module. However, its very simplicity eliminates many variables in final tuning – I decided to keep things easy, and switch back to the Dyna later if the need arose.
3) S/E Dual-Fire Coil (Black)
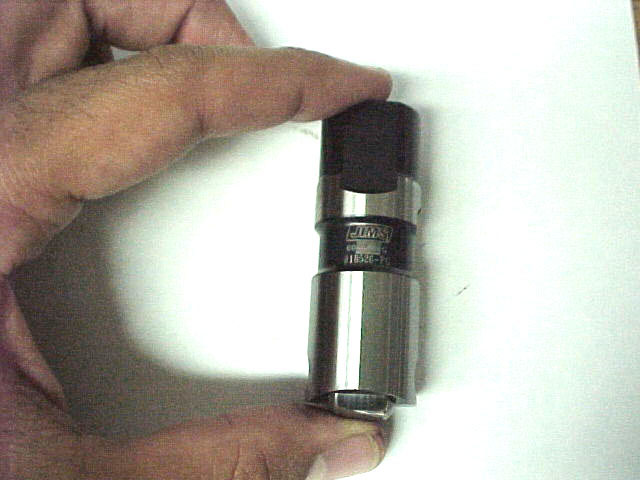
4) JIMS Powerglide Hydraulic Tappets
5) Zipper’s Lightweight Toolsteel 0.791×0.085 Wrist Pins / Stock Buell Circlips
6) James METAL-Series Gaskets (with 0.030″ Head Gasket, for 0.025″ squish)
Assembly: Everything went smoothly, per the FM. The VOES was adjusted to 6.5,” per Nallin’s instructions, to minimize pinging. No unusual problems encountered.
Out On The Road – Break In: You know the drill – it was really hard to keep the speeds and rpms so low, and I was anxious to see what the motor could do. For a baseline, I set the CV at 45slow/185 main, with the Blue Anodized Yost needle in the middle. There was a noticeable increase in power from the old S/E dual-plug setup, but other factors (sound, fuel economy, etc.) remained about the same.
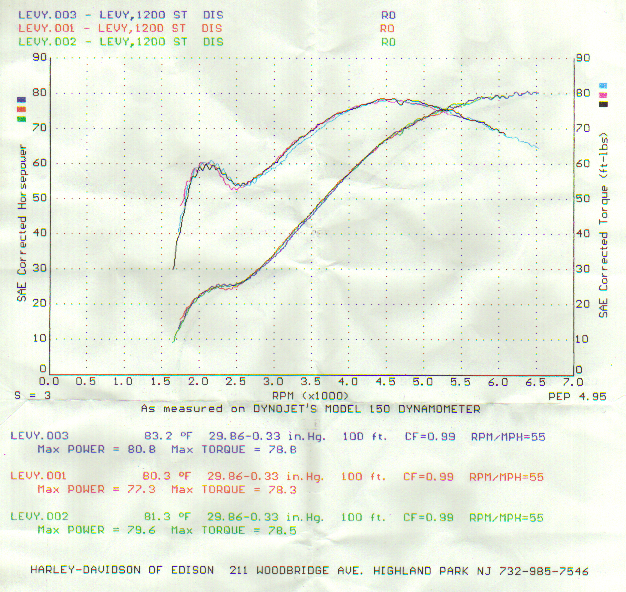
5-12-01 Break-In Complete – The First Dyno Run & JIMS Powerglide Lifter Failure: On the day I broke the bike in (500 miles), Harley Davidson of Edison, NJ was having a dyno shootout. Although I was sure I could improve the performance of the bike with some mild seat-of-the-pants tuning, I decided to take it there as-is, just to get a feel for the power output. The dyno run was free, and no tuning was involved. The results were a little worse than expected – 80.8HP / 78.8TQ – but the dyno operator estimated at least 15% could be added to these numbers with a little tuning. My carburetion was off, as was my timing. The mid-range torque-dip was expected as a function of the 2-into-1 exhaust. Despite the relatively low numbers, the competition was weak that day, and I wound up beating all the other Sportsters, 1340 Big Twins, and 1450 Twin Cams. A worked 1550 Road King won overall, with about 95 HP, but I still managed to get a $50 gift certificate for my second place performance.
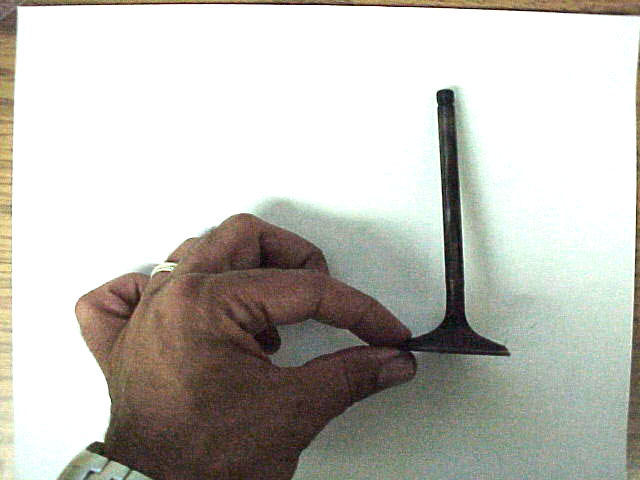
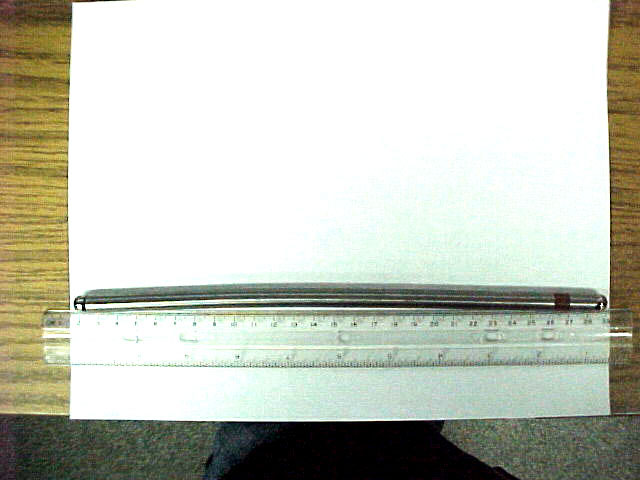
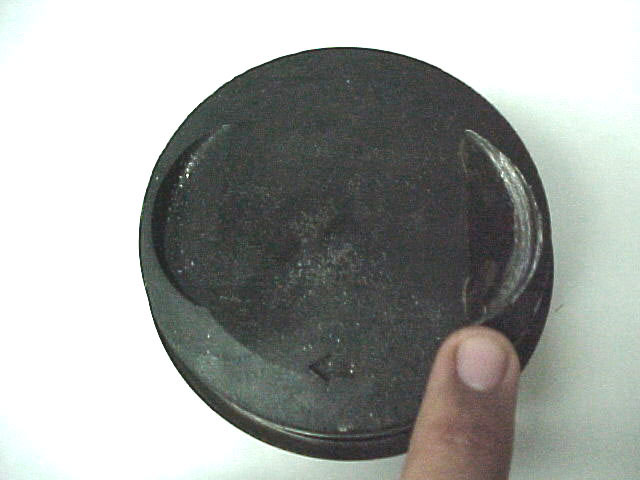
I was on the way back home, at a very sedate 65 mph cruising speed, when a loud CLANK came from the motor. I pulled over to inspect the damage – the motor now ran on one cylinder and couldn’t move the weight of the bike, so I called for a tow. Once I got the bike back home, I tore into it and discovered that the front piston had smacked into the intake valve, bending the valve and pushrod and slightly scuffing the piston in the flycut area for the valve. I took the parts to some of my mechanic friends, and it was determined beyond a shadow of a doubt that the JIMS Powerglide lifter had locked itself in a “pumped up” position, and would not collapse even when completely bled down. We had it in a huge Wilton vice under approximately 800 pounds of force, bled down, and it STILL wouldn’t budge!
Part damage was not too expensive – a new pushrod, a new 1.840” NRHS “Black Magic” intake valve (Nallin himself installed the new valve and inspected the head for any other damage, of which there was none), a new JIMS Powerglide Lifter (still fighting with JIMS for warranty coverage,) and a top end gasket kit. I chose a standard HD top end gasket kit, with the standard 0.055″ head gaskets. The JAMES gaskets were beginning to weep, even though all the torque values on the heads were right. I didn’t want to take any chances this time, squish be damned. I also had the scuff marks on the piston smoothed out, and the ring grooves recut. Other than that, reassembly was without incident.
6-26-01 Dyno Tune at Black Hills Custom Parts: After reassembly, I rode the bike without any problems, tweaking here and there on the timing and carburetion. I was waiting for an open slot in Ken Puzio’s schedule, so he could do a real dyno tune on the setup. Puzio is a master tuner, and I was anxious to see how far he could take the numbers. To make things interesting, I bought a Mikuni HSR42 carburator, to do some back-to-back testing on the dyno and the street. The Mikuni was best with a 160 main, 20 intermediate, clip and all other factors unchanged from factory. The CV40 was best with a 190 main, 42 slow, Yost Blue Anodized needle in the middle position. The stock 40mm manifold was used. Compression testing at normal operating temperature was a rather high 200 psi, front and rear. The results were interesting, to say the least.
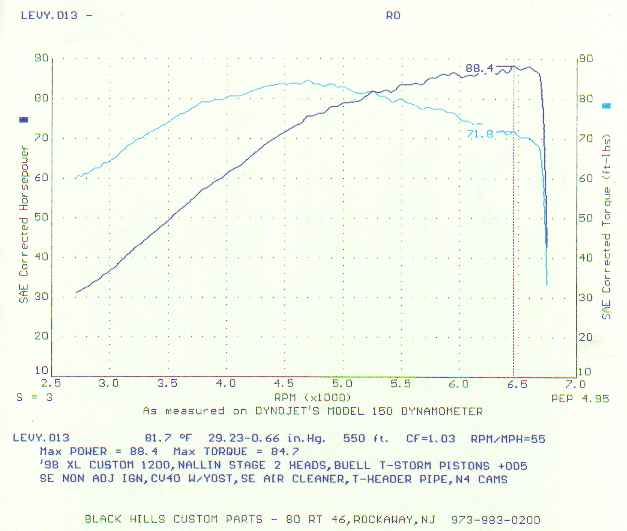
Dyno Chart #1 – Baseline Peak Horsepower and Torque – With S/E A/C – CV40
Max Horsepower CV40 = 88.4 @ ~6,500 rpm
Max Torque CV40 = 84.7 @ ~4,700 rpm
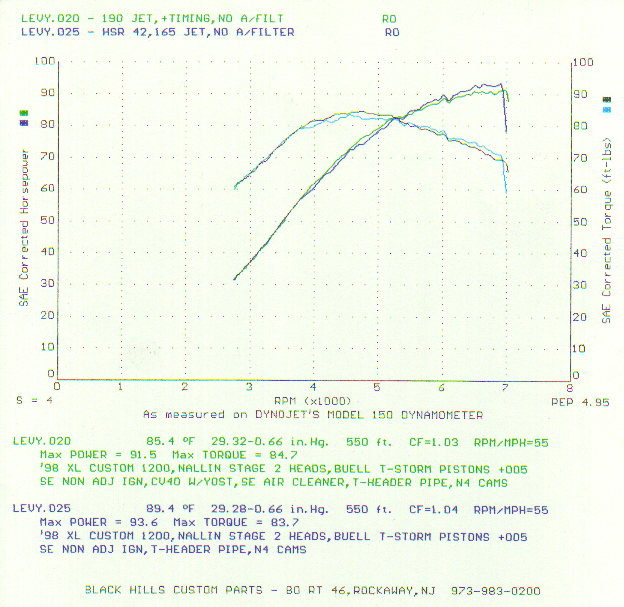
Dyno Chart #2 – Peak Horsepower and Torque – No Air Filter – Mikuni vs. CV
Max Horsepower Mikuni HSR42 = 93.6 @ ~6,800 rpm
Max Horsepower CV40 = 91.5 @ ~6,800 rpm
Max Torque Mikuni HSR42 = 83.7 @ ~4,500 rpm
Max Torque CV40 = 84.7 @ ~4,600 rpm
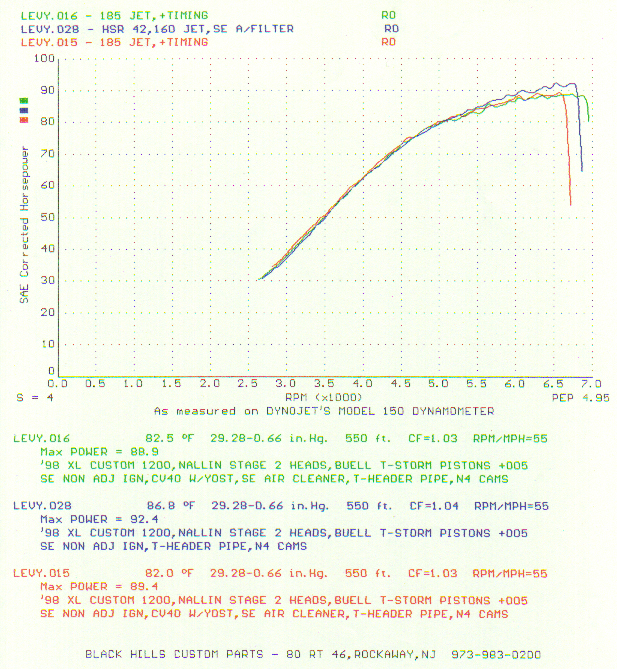
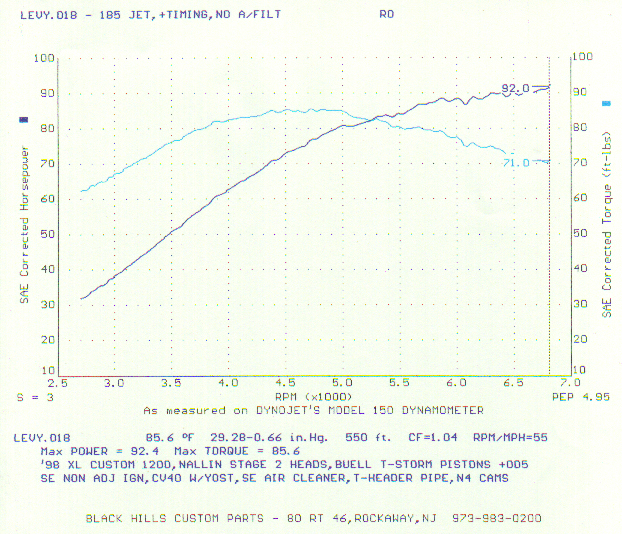
Dyno Chart #3 – Peak Horsepower – With S/E A/C – Mikuni vs. CV
Max Horsepower Mikuni HSR42 = 92.4 @ ~6,600 rpm
Max Horsepower CV40 = 89.4 @ ~6,600 rpm
Dyno Chart #4 – Peak Torque – With S/E A/C – Mikuni vs. CV
Max Torque Mikuni HSR42 = 85.1 @ ~4,700 rpm
Max Torque CV40 = 86.1 @ ~4,600 rpm
Dyno Chart #5 – Peak Horsepower and Torque – No Air Filter – Mikuni
Max Horsepower Mikuni HSR42 = 93.6 @ ~6,800 rpm
Max Torque Mikuni HSR42 = 83.7 @ ~4,500 rpm
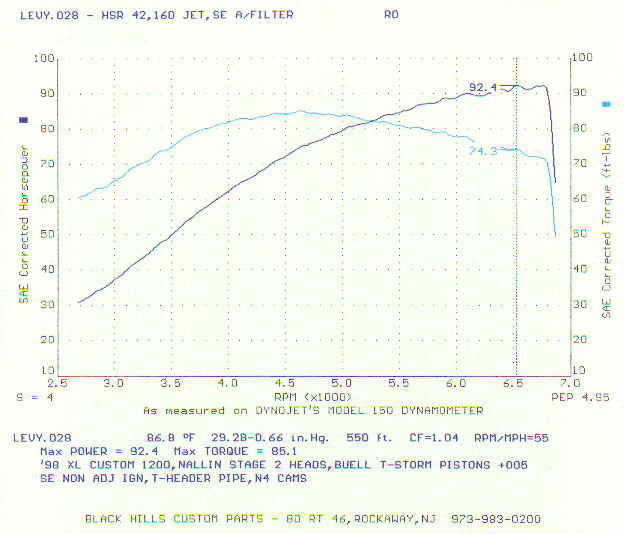
Dyno Chart #6 – Peak Horsepower and Torque – With S/E A/C – Mikuni
Max Horsepower Mikuni HSR42 = 92.4 @ ~6,600 rpm
Max Torque Mikuni HSR42 = 85.1 @ ~4,700 rpm
Never Mind the Theories and Paper Numbers: What does the Mikuni FEEL like?
Conventional wisdom says that the CV is an excellent carburator, and that spending large amount of money on aftermarket carburetors yields little in the way of additional power. The dyno charts above clearly prove this. In fact, the CV has superior torque figures across the range, and often has higher HP until the very high stratosphere of the rpm range. HOWEVER, this is all on paper. No amount of theorizing or studying dyno graphs can equal the value of feel on the street. And in this case, the Mikuni is the winner hands down. The throttle response is instantaneous, with none of the delay of the CV. In fact, it’s quite annoying as even the slightest twitch in your hand sends the motor into the powerband – but you can guess where the response could quickly turn into fun. The old drivability problems I had with the CV, which caused some stumbling problems in the low speed circuit and lean conditions in the midrange, are gone. Those problems haunted me for 2 years, and could not be tuned out. While the HSR42 costs good money, I would say it is the proverbial icing on this cake. I would not, however, recommend buying an aftermarket carb in the hopes of it being a major factor in the bike’s peak numbers, as so many people do. I cannot see what this carb would give you unless you are at Stage II or better – at that point, it becomes worthwhile for drivability alone. Fuel economy seems to be unaffected for now, at a steady 45 mpg city driving cycle, but I haven’t really had it out for long rides yet.
MPG UPDATE 7-6-01: On a 1,000 mile trek through New England in early July 2001, with passenger and well over 75 pounds of luggage, the bike returned an astonishing mixed MPG of 60.3! Amazingly frugal for an engine with this much power output. This means the bike is tuned to a knat’s ass!
OVERALL FINAL THOUGHTS
I worked hard on this project for months, learned much along the way, and am now busy enjoying the fruits of my labor. I can safely say that I’m about as near to making a reliable, high-performance street Sportster as I could get given my time and budget constraints. It’s an absolute blast to ride, and I’m loving every single second of it. Special thanks to Brain Nallin and Ken Puzio for their help and expertise.