MKL’s ’98 1200C – How To Deal With The Oil Blowby Phenomenon
One of the most common “problems” with Sportsters is the so-called “oil blowby phenomenon,” which is when oil leaks out of the air cleaner assembly and drips out all over the engine and your right leg. It’s not an oil geyser by any means, but it can get annoying and does require frequent cleaning, especially when a free-flowing air cleaner assembly is installed. Despite the fact the the solution to this problem is relatively cheap, extremely easy to install, and very effective, many riders are unaware of it and have resorted to stuffing dishwashing sponges, paper towels, and even women’s sanitary napkins into their air cleaner housings – or just accepting the phenomenon as part of Sportster ownership. This article is meant to help people who want to stop the oil blowby phenomenon in a cheap, quick, and effective way.
Why is oil leaking out of your air cleaner? Many newbies automatically assume that something is wrong with their Sportsters, and many Harley mechanics answer their concerns by saying “That’s just a part of riding a Sportster. Deal with it.” Both sentiments are wrong. In layman’s terms, on late model Evolution motors which “breathe” through the heads, there are crankcase breathers which let built-up crankcase pressure within the engine (essentially an air / oil mist) vent into the inside of the air cleaner. The idea, in theory, is that this air / oil mist will be sucked back into the engine through the carb and burned up in the combustion process. The reality, however, is that this oil can sometimes build up faster than the motor can suck it in. As a result, the excess oil buildup drains to the bottom of the air cleaner assembly via gravity, and drips out onto the engine and everywhere else the wind blows it while you ride. This situation is greatly exacerbated when the bike has a less restrictive air cleaner assembly, such as the common Screamin’ Eagle setup. Although there are a few variables that contribute to this situation (how tight your piston rings seal, how hard you ride, what mods you’ve made, etc. etc.) the situation is usually worst when your oil tank is completely full, you have a free-breathing air cleaner assembly, and you’ve ridden hard for a while. An owner in this situation may find the streaks of escaped oil decorating the entire right side of his bike after only a few minutes.
What you can do about this: The first step is to ignore people who tell you to “live with it,” and to bypass temporary band-aid solutions like dishwashing sponges and the like. A variety of devices exist to solve this problem once and for all. They are called “breather kits.” A generic “Horseshoe” type is shown below-
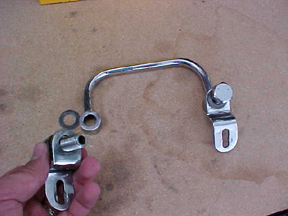
A typical “Horseshoe Style” Breather Kit – Note the hollow bolts, which mount the Horseshoe to the heads (3/03)
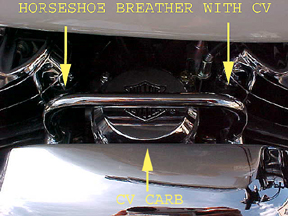
The “Horseshoe Style” Breather Kit installed with CV Carburator and Screamin’ Eagle air cleaner assembly (3/03)
The concept of the Breather Kit is simple – the two hollow bolts shown screw the chrome “horseshoe” onto the heads’ crankcase breathers (usually with some 1/2″ x 18 gauge washers between the bolts and “horseshoe”), and the holes in the bolts line up perfectly with openings in the the “horseshoe” when everything is tightened down. The “horseshoe” has either one or two nipples (for reference, the generic picture of the V-Twin Manufacturing Breather below shows one nipple on right side) onto which a rubber line (usually 3/8″ fuel line works well) is connected. This line is run down to the bottom of the bike’s frame, and either left dangling or terminated in a “breather filter,” as shown below.
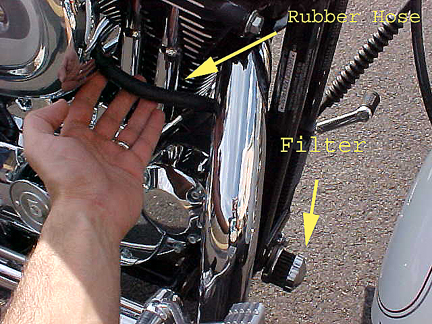
The breather hose capped with filter (3/03)
In so doing, all of the oil mist is now blowing directly out of the end of the rubber hose, instead of out of the air cleaner and all over the side of the bike. Thus, it pays to direct the rubber hose away from anything you don’t want to get covered in blowby – namely, aim it away from your tires! I’ve found that aiming it directly to the ground (hose at midpoint of frame with about 1″ of space between the hose end and the ground) works best. See below:
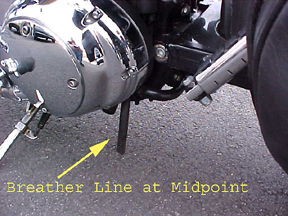
The breather hose can also be mounted at the bike’s midpoint, as shown (3/03)
Which Brands Work? What About Crank Vent Kits? Should you drill the Oil Drain Holes in the Rocker Boxes? The generic breather kit solution proposed herein works as well as anything else I’ve tried, for about $50 total and 30 minutes of installation time. They are available for your Sportster through every major vendor outlet (V-Twin Manufacturing, Drag Specialties, Custom Chrome, Kuryakyn, Biker’s Choice, etc.) in existence at your local shop. Naturally, there are more expensive solutions – you can buy $200 fancy billet breather kits, stainless line instead of rubber, tiny $100 canisters with 5 cent umbrella valves in them sold as “crank vents,” kits that require drilling or modification of the drain holes in the rocker boxes, or even $150 billet chrome “catch cans” which catch the oil that the breather hose spews out. There are all sorts of ways you can turn this project into an excuse to spend much more money and time, but performance-wise, you will gain little or nothing. The goal of this project, which the $40 kits accomplish just as well as the $200+ kits, is merely to divert the oil blowby from entering the air cleaner assembly, and instead routing it via the rubber line to wherever the owner chooses to exhaust the mist. In this way, the bike stays clean and dry, and the problem is solved without the aid of dishwashing sponges, paper towels, sanitary napkins, and other such temporary solutions.
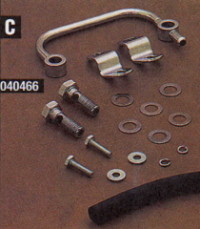
A Generic Breather Kit from V-Twin Manufacturing (p/n 31-0434)- Cheap and Effective
Basic Installation Tips: For some reason, much like the infamous oil debate, the issue of breathers is often filled with rumors and incorrect information. For the record, most of these generic breather kits (such as the V-Twin “Horseshoe” model shown above) do work with the venerable Screamin’ Eagle air cleaner assembly. For reference, see below:
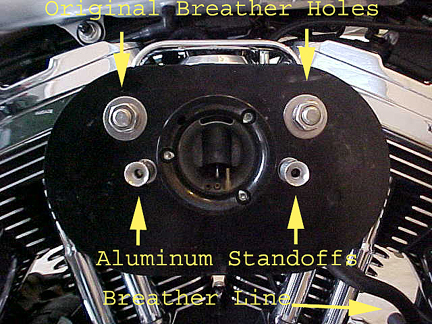
Figure (1): The S/E backplate with “Horseshoe” style breather installed
Figure (1) illustrates how a properly installed breather looks like from the perspective of looking at the S/E backplate. The original breather holes, as shown, must be plugged up. The easiest way to do this is to use hardware, as shown, but some use tape. Hardware is obviously more durable. Don’t forget to use Loc-Tite! The other holes in the backing plate are used to secure the breather’s “Z” brackets on the rear side, with the bolts coming through the brackets and backplate, and threaded into the aluminum standoffs as shown. See below for further detail.
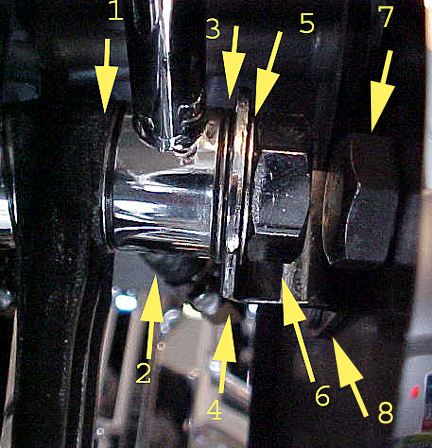
Figure (2): The S/E backplate with “Horseshoe” style breather installed
Figure (2) highlights the order of parts used in the installation of the V-Twin 31-0434 breather to the S/E air cleaner assembly. Specifically, from the head’s crankcase breather outward (left to right as shown):
1) 1/2″ x 18 gauge washer
2) Chrome Horseshoe
3) 1/2″ x 18 gauge washer
4) Z-bracket – secure with bolt through backing plate and thread into aluminum standoff on backing plate’s front side as shown in Figure (1).
5) 1/2″ x 18 gauge washer
6) Hollow breather bolt – Do not overtighten! These are easy to break!
7) Old breather holes in backing plate – plug these up with hardware or tape (hardware shown).
8) Bolt securing Z-bracket to backing plate, threaded into aluminum standoff on backing plate’s front side as shown in Figure (1).
Naturally, you perform the same installation procedure for the other end of the “Horseshoe.”
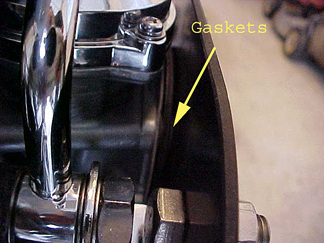
Figure (3): Gaskets between the carburator and S/E backing plate.
carburator on the manifold and install the breather assembly as shown in Figures (1) and (2).
The last step, once everything else is done and the breather / backing plate is fully secured, is to tighten the three allens going through the venturi ring and holding the carburator to the backing plate. Doing this pulls the carb “out” slightly towards the secured backing plate, as it crushes the “gasket sandwich” and makes a tight seal with the backing plate. Once this is done, put the air filter back in place and button up the air cleaner cover.
Routing the Breather Hose Into the Air Cleaner: Many Harley mechanics defeat one of the primary benefits of the breather kit when they route the breather hose into the air cleaner, on the inside of the air filter itself. Besides the fact that this defeats the purpose of the breather in the first place, it allows an oily mist into the combustion mix of your engine. The engine is designed to ignite a mixture of gas and air in the combustion cycle – adding a heavy oil mist to this mixture serves to greatly contribute to excess carbon formation in the combustion chambers and on piston tops as the oil burns along with the gas and air. Obviously, this leads to an eventual decline in the performance and reliability of the motor in the long term through this and other related factors (such as fouled plugs). So, if you have your breather hose routed into your air cleaner, reroute it to the atmosphere – the EPA may not approve, but your engine will thank you for it.
Aftermarket Carburators: In general, the generic kits that work for a CV will work for aftermarket carbs as well – the main thing to check is physical clearance if using a “horseshoe” design breather. In my case, the chrome “horseshoe” clears my Mikuni HSR42’s top by only 2mm or so. In order to remove the Mikuni, I would need to also remove the horseshoe since the Mikuni doesn’t fit under it, as a CV carb does. Thus, if the carb needs to be removed often, the solution is to use a Mikuni or similar breather kit, which uses a separate nipple (aiming down) per each hollow bolt instead of an overreaching horseshoe design. The hose from each nipple then meet in a “T” connection, and from there are routed as detailed above (or, they can be run separately). See below for a picture. The price of a Mikuni breather is comparable to any other generic brand – about $50.
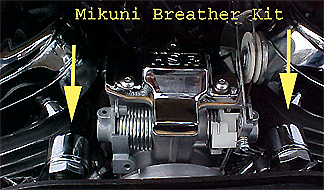
The Mikuni Breather Kit installed with an HSR42 and Screamin’ Eagle air cleaner assembly (3/03)
Addendum I: The Stock A/C Issue
Background: For those who have this issue occurring with the stock a/c backing plate, lister “Twincam1449” sent me the following solution. I have not tried this myself, nor seen it in person, so I cannot personally comment on its effectiveness, though it seems to be a viable solution. Twincam1449’s instructions (as send to me on 4/5/2003) read as follows:
“Hello Moshe,
Herewith I send you two pictures from the changed breather on my girlfriends 883 C Sportster (1200 conversion)
Too much oil was sucked into the engine. So I had to find a solution for this. One ‘problem’: my girlfriend wanted to keep the stock backplate. As you can see in the pictures I modified the routing as follows:
1) Tapped M8 (metric) thread into the stock breather bolts ( with this size I didn’t damage the allenkey head)
2) Cut off the head from a M8 bolt and cut a line into the bolt for a screwdriver, screwed in the bolt with red loctite
3) Drilled a 4mm hole 1/2″ behind the head of the stock breatherbolt completely through the bolt.
4) Tapped an elbow into the backplate (into the metaltube moulded into the backplate), secured with red loctite.
5) Put a 15.5mm drill through the metal tube to drill off the excessive part of the elbow inside the tube
6) As the breatherbolt is much less in diameter than the tubes, I welded a washer onto the bolt 1″ behind the head. Made the washer approx. the same diameter as the inside of the tubes. I did this to prevent the bolt from closing the hole in the elbow. Now the washer keeps the breatherbolt centered in the tube. Resulting in enough space between the bolt and the tube for the (oily) air.
7) Drilled two holes in the backplate to route two hoses from the elbows from both breatherbolts to below the backplate.
8) Cut off some material on the lower part of the backplate, to accomodate a twin connection breather filter
The air will flow from the heads -> into the breather bolt (as stock) -> flow from the bolts into the tubes via the new 4mm holes (old holes are plugged) -> via the elbows into the hoses towards the breatherfilter.
I sent you this info as you may have been or will be asked for a solution for the stock backplate.
You could change following: Use hex head bolts (bigger heads, thus bigger contact area) and put thin soft copper washers between the cylinder and the tube and between the tube and the bolthead. Of course you have to drill the breather channel into the bolts.”
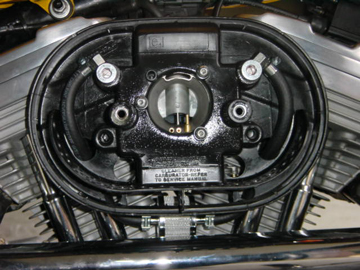
Twincam1449’s Picture 1: The Stock A/C Backing Plate Breather Mod Installed
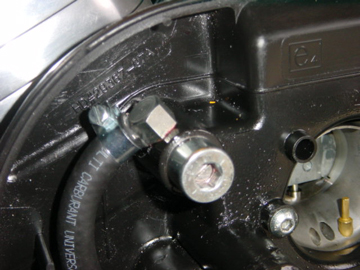
Twincam1449’s Picture 2: Close Up of the Tapped Stock Breather Bolt
MKL’s Comments (5/03): After the posting of the original article above, I received quite a few responses from people who run stock A/Cs and were suffering from oil blowby. Twincam 1449’s instructions were the best, most detailed instructions I could find as to how to deal with this issue. That said, I really cannot understand why someone would keep the stock A/C in the first place, when for $60 one can buy a free flowing unit which would be, dollar for dollar, the best performance investment one can make. Apparently, in addition to vastly superior performance, the addition of a proper breather is also far easier on the higher-performing free flow A/Cs than on the stock A/C. Therefore, my advice for all of you who run stock A/Cs is to replace them outright with free flowing units, with breathers properly installed as shown.
